Share Mac screenshots from the notch without losing the file
A screenshot has two separate jobs: capture what you need, then get the resulting file into the right conversation or folder. A temporary tray can shorten the second step, but it should never be your only record of an important image.
This guide follows the file from capture to delivery. You can use the ordinary macOS workflow without installing anything, or use NotchStar’s Screenshot Tray as a temporary place to pick up recent captures.
Capture only what you need
Press Shift + Command + 5 to open the macOS Screenshot controls. Choose the whole screen, a window or a selected portion according to what the recipient needs. Apple documents those options in its Screenshot guide, checked on 2 November 2026.
Before capturing, look for private information in the selected area. A smaller capture is often easier to explain as well as easier to share. A support report usually needs the affected control and its message, rather than your entire desktop.
You can also use Screenshot’s Options to review the save destination. Knowing that location is useful even if you normally send images directly from a preview or a tray.
Use the normal saved file when that is enough
For an occasional screenshot, there is no need to add a utility. Open the folder where the capture was saved, find the image and drag it into your destination. Keep a copy in a project folder if the image is part of a document, decision or support request you may revisit.
If you take several captures in a row, inspect each image before sending. Similar thumbnails are easy to mix up. A short description in the message can make the relevant detail clearer than an unexplained attachment.
Pick up a capture from the notch
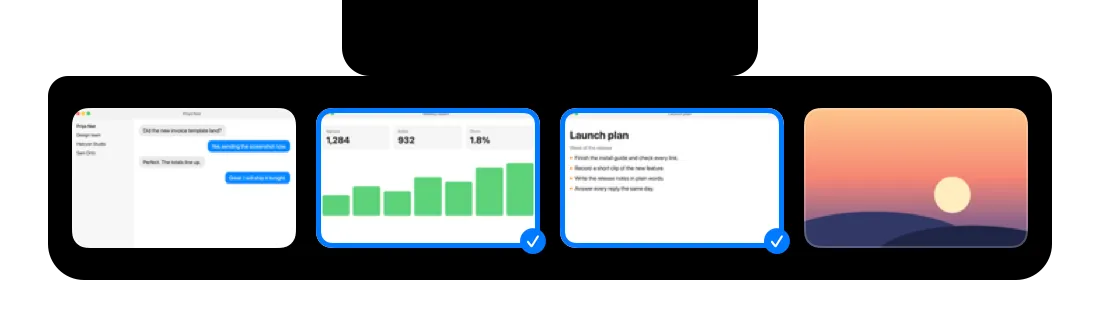
The real app render above uses sample images. It illustrates the tray, rather than showing private screenshots from the author’s computer.
With NotchStar running, take a screenshot using your normal macOS method. A thumbnail appears under the notch. Drag it into an app or folder that accepts image files. You can also send it to the Shelf if you want to park it there as part of a file sharing workflow.
After you use a screenshot, its entry leaves the tray. That is a change to the temporary list, not an instruction to delete the original file. The image remains wherever macOS saved it unless another action moves or removes it.
Send the right group of images
Command click the screenshots you want to select, then drag one of those selected images. If you want everything currently in the tray, hold Option while dragging.
Before sending the group, count the selected images and check that none contains private information. If the destination app handles a group differently from a single attachment, try one harmless sample image first. The destination controls how attachments are added to its composer.
| Action | Tray result | Original file |
|---|---|---|
| Leave an unused image for five minutes | Entry expires | Remains in its saved location |
| Add more than 12 screenshots | Older entries leave | Remain in their saved locations |
| Use an image by copying or sending it | Entry leaves | Expiry itself does not remove it |
| Explicitly drag an image to the Trash | Entry is no longer useful | File goes to the Trash |
If the thumbnail does not appear immediately
The macOS corner preview can delay when a capture becomes available as a saved file. NotchStar’s optional Show screenshots instantly setting turns off that preview while the app is running. It asks before changing the setting and restores the original setting when NotchStar quits. It does not change the save destination.
Decide whether you prefer the macOS preview or the tray before enabling the option. For missing captures, check the save destination and the actual file first. A screenshot that is no longer in the tray may simply have expired or been used.
Find a capture after the preview vanishes
Open Screenshot with Shift + Command + 5 and review Options to identify the save destination. Then check that folder in Finder. If you selected a different destination previously, looking only at the Desktop can make a saved image appear missing.
The corner preview, the saved file and the notch tray entry are three different things. Closing or waiting out the preview does not mean the image has been deleted. A tray entry can also disappear after use, expiry or reaching the tray limit. Check the actual saved file before taking the same screenshot again.
Save images you need later
The tray is designed for the moment between taking a screenshot and sending it. It is not a gallery, backup or project archive. Put images you need later in an ordinary folder with the rest of the work.
For a broader mix of documents and images, read the file shelf workflow. For the exact tray controls and limits, see the Screenshot Tray feature page.